Understanding the Ceramic 3D Printing Process Step-by-Step
Source by lodestar3d.com
Ceramic 3D printing is transforming the way advanced ceramic components are designed, tested, and manufactured. Traditionally, ceramic parts required moulds, machining, casting, or complex forming techniques. These methods can be time-consuming, costly, and restrictive when the part has a complex geometry or when the requirement is for small batches, prototypes, or research-based development.
With ceramic additive manufacturing, the process becomes more flexible. Engineers, researchers, and manufacturers can create detailed ceramic parts directly from digital designs. This makes ceramic 3D printing useful for technical ceramics, investment casting workflows, advanced material research, aerospace and defense applications, education, industrial applications, and jewelry or casting-related work.
Lodestar3D offers ceramic 3D printing solutions such as Ceram PRO 365, Ceram PRO 385 / 385+, and Ceram PRO 405 / 405+. These systems are designed for industrial ceramic 3D printing applications where precision, material workflow, and production flexibility are important.
Table of Contents
What Is Ceramic 3D Printing?
Ceramic 3D printing is an additive manufacturing process used to create ceramic parts layer by layer. Instead of removing material from a solid block, the printer builds the part from a digital file. In DLP-based ceramic printing, light is used to selectively cure a ceramic-filled resin or slurry, forming each layer of the part.
Once the part is printed, it usually goes through post-processing steps such as cleaning, debinding, sintering, and finishing. These steps are important because ceramic parts need to achieve the required strength, density, surface quality, and final dimensions.
Ceramic 3D printing is especially valuable when the part requires fine detail, complex internal features, small-batch production, or advanced material testing.
Step 1: Application and Design Planning
The ceramic 3D printing process begins with understanding the application. Before selecting a printer or material, the team must define what the part needs to do.
Important questions include:
Is the part for technical ceramic use?
Is it for investment casting or ceramic core development?
Does the part need high heat resistance?
Is it a prototype, functional component, or research sample?
What level of detail and surface finish is required?
What are the final strength and dimensional requirements?
This stage helps decide the correct design approach, material workflow, and printer model. For example, Ceram PRO 365 may be considered for high-resolution ceramic printing, silica and alumina workflows, and investment casting-related applications. Ceram PRO 385 / 385+ and Ceram PRO 405 / 405+ may be evaluated when open-material workflows, wavelength compatibility, or higher throughput are important.
Once the application is clear, the next step is to create a 3D CAD model. This digital model defines the shape, dimensions, wall thickness, internal features, and overall geometry of the ceramic part.
Designing for ceramic 3D printing requires careful planning. Ceramic materials behave differently from plastics and metals. Shrinkage during sintering, support needs, feature thickness, part orientation, and post-processing requirements must be considered early in the design stage.
A well-prepared CAD model reduces printing errors and improves the chances of achieving the desired final part quality.
Material selection is one of the most important steps in the ceramic 3D printing process. Different ceramic materials offer different properties, such as heat resistance, hardness, electrical insulation, wear resistance, chemical resistance, and dimensional stability.
Common ceramic workflows may involve materials such as silica, alumina, or other ceramic-filled systems where validated. The choice of material depends on the end use of the part.
For example, investment casting applications may need ceramic patterns or cores with specific thermal and dimensional performance. Technical ceramic applications may need materials that can handle heat, wear, or demanding operating conditions.
Lodestar3D’s ceramic printer range supports industrial users who need to evaluate material compatibility, application requirements, and production goals before selecting the right system.
Step 4: Preparing the Print File
After the 3D model is ready, the file must be prepared for printing. This step usually involves importing the model into build preparation software, selecting the print orientation, adding supports where needed, and slicing the model into layers.
Slicing converts the 3D model into a set of thin layers that the printer can build one by one. Parameters such as layer thickness, exposure settings, support design, and build layout are adjusted based on material, part geometry, and desired quality.
Ceram PRO systems are positioned for high-resolution DLP ceramic printing. Depending on the model, users can work with specific wavelengths such as 365 nm, 385 nm, or 405 nm. The choice of wavelength and material workflow should be matched carefully to the application.
Schedule A Call
+91 990-000-3300
Step 5: DLP Ceramic Printing
In the printing stage, the ceramic-filled resin or slurry is exposed to light in a controlled pattern. DLP technology projects light to cure each layer of the material. Once a layer is formed, the system moves to the next layer and repeats the process until the complete green part is produced.
This stage requires stable process control. Light power, layer thickness, material behaviour, exposure time, and platform movement all affect the quality of the printed ceramic part.
Lodestar3D’s Ceram PRO range includes models designed for industrial ceramic applications. Ceram PRO 365 uses 365 nm UV-LED DLP technology and is positioned for high-resolution workflows. Ceram PRO 385 / 385+ and Ceram PRO 405 / 405+ support ceramic printing workflows where open parameters, production speed, modular platforms, and material development flexibility may be important.
Step 6: Cleaning the Printed Part
After printing, the ceramic part is not yet ready for final use. It is in a green state, which means it has the required shape but has not yet achieved its final ceramic properties.
The printed part is carefully removed from the build platform and cleaned to remove uncured material. This step must be handled properly because the green part can be delicate. Incorrect handling may damage fine features, thin walls, or detailed surfaces.
Cleaning helps prepare the part for the next stages of debinding and sintering.
Step 7: Debinding
Debinding is the process of removing the binder or resin content from the printed ceramic part. Since the printed part contains ceramic particles along with a cured binder system, the binder must be removed before the final ceramic structure can be achieved.
Debinding must be carefully controlled. If the binder is removed too quickly or unevenly, the part may crack, deform, or fail. The process depends on the material system, part geometry, wall thickness, and recommended processing conditions.
This is one reason why ceramic 3D printing requires process knowledge, not just a printer. Successful production depends on matching the printer, material, design, and thermal processing workflow.
Step 8: Sintering
Sintering is the stage where the ceramic part is heated at high temperature to densify the material and develop its final properties. During sintering, the ceramic particles bond together, and the part becomes stronger and more stable.
Shrinkage usually occurs during sintering, so the original design must account for the expected dimensional change. The amount of shrinkage depends on the material, part geometry, and firing process.
Sintering is a critical step because it determines the final performance of the ceramic component. Proper sintering helps achieve the required density, strength, and functional characteristics.
Step 9: Finishing and Quality Inspection
After sintering, the part may require finishing. This can include support removal, surface finishing, polishing, machining, dimensional inspection, or other post-processing steps depending on the application.
Quality inspection is also important. Teams may check dimensions, surface quality, density, defects, and application-specific performance. For industrial parts, validation may include mechanical, thermal, or functional testing.
Ceramic 3D printing should always be treated as a complete workflow. The final result depends not only on the printing stage but also on design, material preparation, debinding, sintering, and finishing.
Ceram PRO Ceramic 3D Printers from Lodestar3D
Lodestar3D offers the Ceram PRO ceramic 3D printer range for industrial users, researchers, and organizations exploring advanced ceramic additive manufacturing.
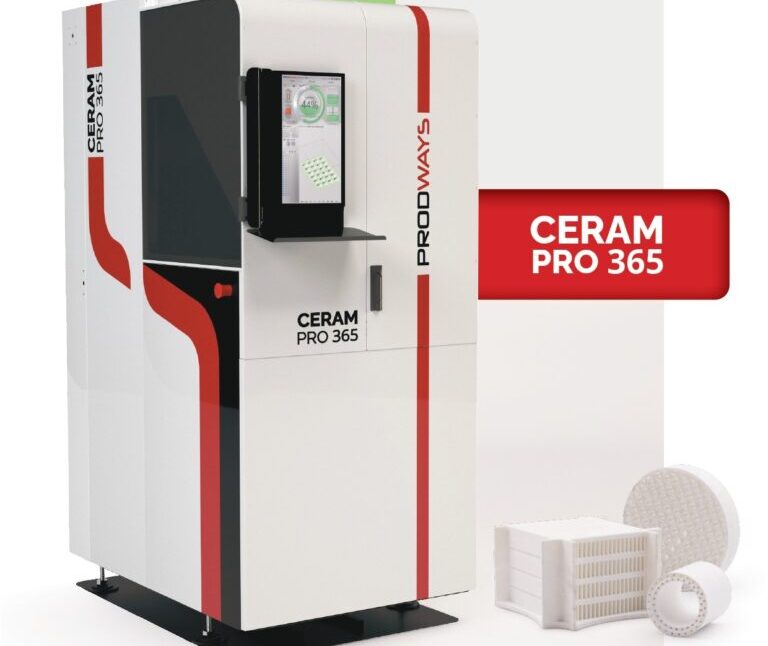
Ceram PRO 365
Ceram PRO 365 is suitable for high-resolution ceramic 3D printing. It uses 365 nm UV-LED DLP technology and is positioned for workflows involving investment casting-related applications, technical ceramics, and R&D. It is also relevant for silica and alumina material workflows where validated.
Ceram PRO 385 / 385+
Ceram PRO 385 / 385+ is designed for ceramic DLP printing workflows using 385 nm wavelength. The 385 model uses a single DLP head, while the 385+ version supports a dual-head configuration for higher throughput. This range is useful for open-material workflows, technical ceramic development, and application-specific R&D.
Ceram PRO 405 / 405+
Ceram PRO 405 / 405+ supports ceramic DLP printing at 405 nm wavelength. Like the 385 range, it is available in single-head and dual-head configurations. The 405+ version is suitable for users who need higher throughput along with open-material flexibility and application validation.
Applications of Ceramic 3D Printing
Ceramic 3D printing is used across several advanced industries. Its value is strongest where complex geometries, material performance, and production flexibility are important.
Investment Casting
Ceramic 3D printing can support investment casting-related workflows, including complex patterns, cores, and detailed casting applications.
Technical Ceramics
The process is useful for high-performance ceramic parts, prototypes, and functional components after validated firing workflows.
Research and Development
Universities, laboratories, and R&D teams can use ceramic 3D printing to test new materials, part designs, geometries, and manufacturing methods.
Aerospace and Defense
Ceramic parts may be evaluated for advanced manufacturing applications that require lightweight, heat-resistant, or complex ceramic geometries.
Energy and Industrial Applications
Ceramic 3D printing can support development work related to insulation, filtration, thermal components, and other industrial ceramic parts.
Jewelry and Casting
For casting-related workflows, ceramic 3D printing can help produce detailed components where surface quality and fine features are important.
Benefits of Ceramic 3D Printing
Ceramic 3D printing offers several advantages for industrial and research users:
Ability to produce complex ceramic geometries
Reduced need for traditional tooling
Better design freedom
Suitability for prototypes and small batches
Support for advanced material development
Useful for investment casting and technical ceramic workflows
High-resolution production capability
Flexibility for R&D and application-specific validation
For companies that need to move from concept to ceramic part development faster, ceramic additive manufacturing provides a strong advantage.
FAQ's
Lorem ipsum dolor sit amet, consectetur adipiscing elit. Ut elit tellus, luctus nec ullamcorper mattis, pulvinar dapibus leo.
What is the ceramic 3D printing process?
The ceramic 3D printing process involves designing a 3D model, selecting the ceramic material, preparing the print file, printing the part layer by layer, cleaning the green part, debinding, sintering, finishing, and inspecting the final component.
Which ceramic 3D printers does Lodestar3D offer?
Lodestar3D offers ceramic 3D printing solutions including Ceram PRO 365, Ceram PRO 385 / 385+, and Ceram PRO 405 / 405+.
What is Ceram PRO 365 used for?
Ceram PRO 365 is used for high-resolution ceramic 3D printing, investment casting-related workflows, technical ceramics, and R&D applications. It is suitable for silica and alumina workflows where validated.
What is the difference between Ceram PRO 385 and Ceram PRO 385+?
Ceram PRO 385 uses a single DLP head, while Ceram PRO 385+ uses dual DLP heads for higher throughput. Both are designed for 385 nm ceramic printing workflows.
What is the difference between Ceram PRO 405 and Ceram PRO 405+?
Ceram PRO 405 uses a single DLP head, while Ceram PRO 405+ uses dual DLP heads for faster throughput. Both support 405 nm ceramic printing workflows.
Is ceramic 3D printing suitable for R&D?
Yes. Ceramic 3D printing is highly suitable for R&D because it allows teams to test new materials, complex geometries, process parameters, and advanced ceramic applications.
Does ceramic 3D printing require sintering?
Yes. Most ceramic 3D printed parts require debinding and sintering after printing to remove binder content and develop final ceramic properties.
Can ceramic 3D printing be used for investment casting?
Yes. Ceramic 3D printing can support investment casting-related applications, especially where complex shapes, fine details, and casting workflows are required.
Is ceramic 3D printing only for prototypes?
No. Ceramic 3D printing is useful for prototypes, R&D, small batches, technical ceramic parts, and selected industrial applications. Final use depends on material validation and application requirements.
Where can I learn more about ceramic 3D printers in India?
You can explore ceramic 3D printer options, including Ceram PRO 365, Ceram PRO 385 / 385+, and Ceram PRO 405 / 405+, with Lodestar3D.
Conclusion
The ceramic 3D printing process is a complete workflow that includes design, material selection, print preparation, DLP printing, cleaning, debinding, sintering, finishing, and inspection. Each step plays an important role in achieving a successful ceramic part.
For industries working with technical ceramics, investment casting, advanced materials, aerospace and defense, energy, industrial applications, education, and R&D, ceramic additive manufacturing offers strong potential. It allows teams to create complex ceramic geometries, reduce tooling dependency, and accelerate product development.
Lodestar3D’s ceramic printer portfolio, including Ceram PRO 365, Ceram PRO 385 / 385+, and Ceram PRO 405 / 405+, provides options for different ceramic printing workflows, wavelengths, throughput needs, and application goals.
As demand grows for high-performance ceramic components, ceramic 3D printing will continue to play an important role in advanced manufacturing. For organizations looking to explore industrial ceramic additive manufacturing, understanding the process step by step is the first move toward selecting the right machine, material, and production workflow.
Lorem ipsum dolor sit amet, consectetur adipiscing elit. Ut elit tellus, luctus nec ullamcorper mattis, pulvinar dapibus leo.